So. Here we are. The third part of the long-running series where I try to improve my Internet condition. So no point beating around the bushes. I plan to transform my 4G connection into Wifi using whatever was available to me, because I'm a cheapskate that refuse to spend money, but had no problem spending it on a thermometer, then broke it by putting it in a freezer. I also enjoy learning how networking works, as I always thought that a router is like a magic box. It was when I got an Asus router, turned on ssh that I discovered routers are all Linux boxes.
Prerequisites
To prepare for this job, I dug up my old Raspberry Pi 3. I haven't had much use for it since my HP laptop took over the server work from the board. It has 4 USB port and a LAN port. My plan was to turn this board into a router. Just a router, not one of those combo things that you commonly find. The LAN port would be connected to a Wifi access point (AP). For the USB port, I plugged a 4G USB Modem with a SIM card placed in.
The TP-Link Archer C50 router currrently in use would be turned into AP in place of a router. The reason was that the Raspberry Pi has a weak Wifi chip, it couldn't transmit very far, not like a dedicated device would. Moreover, I didn't need its routing function.
The 4G USB Modem would be a Sony Xperia Z. I borrowed it for this job because it wasn't in use and it could install a custom ROM or OS, free from restrictions of the original ROM. I used Lineage OS 16, which was Android 9 for the phone. Android 9 and later allows you to set your phone to USB tethering mode as default anytime it is connected via USB.
A 4GB or higher micro SD card was needed to install a router OS of your choice. In this case, OpenWrt.
Location. You need to get as close as possible to a cell tower from your house. This would require you to use a phone with the SIM card you want to use as the source to find a cell tower that belongs to the SIM network. You can check signal strength by going to Settings -> About phone -> SIM Status or something similar. Keep an eye on the negative number and dBm. The higher the number (lower number in negative) the better the signal. You can also use speedtest.net or fast.com to make a quick speed test.
Preparing the router
![]()
The reason I chose OpenWrt for my router OS is that, while it's intriguing to DIY by using Raspbian and set everything up using iptables for NAT, ufw for firewall, dnsmasq for DNS, DHCP, it's a lot of work to set it up separately. Instead, OpenWrt offers a web UI (luci) to help you set everything up quickly. I also wanted to try it out on a real scenario, as before this I ran it on my virtual machine to get a feel of the OS.
Go to the download page of OpenWrt, get the latest version, with target as bcm27xx -> bcm2710 (Raspberry Pi 3 SoC). They offer 2 choice, ext4-factory or squashfs-factory. I chose ext4 due to ease of use, as I can use GParted to expand the data partition to full. squashfs takes more steps, and has to be done in terminal. I might try out squashfs version later, because that's the version normally used in modified routers. After downloading the gzip file, extract it to get the image (img) file. Use either balenaEtcher or dd command to flash it to the SD card (sda in this example):
dd if=openwrt.img of=/dev/sda bs=1M
After that, put the card in the Pi, plug in the power and boot it up.Connect to your Pi using LAN and open the browser, type in http://192.168.1.1/ (default IP of the LAN interface) with username root, no password to enter OpenWrt management.
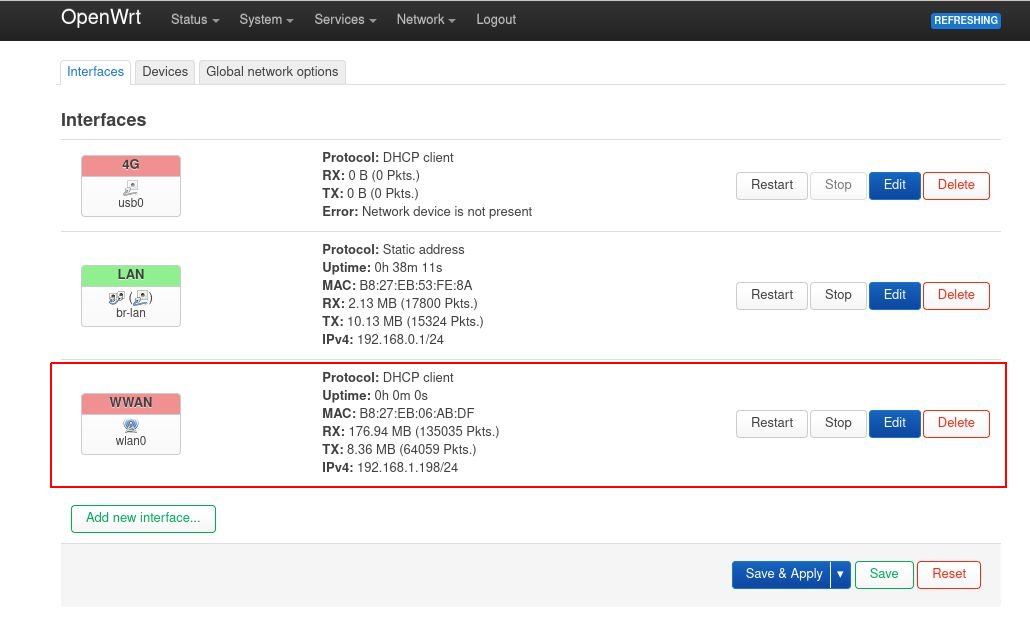
First, we need to install some additional packages. Go to Network -> Wireless. Press Scan on a wireless interface to connect to an access point.
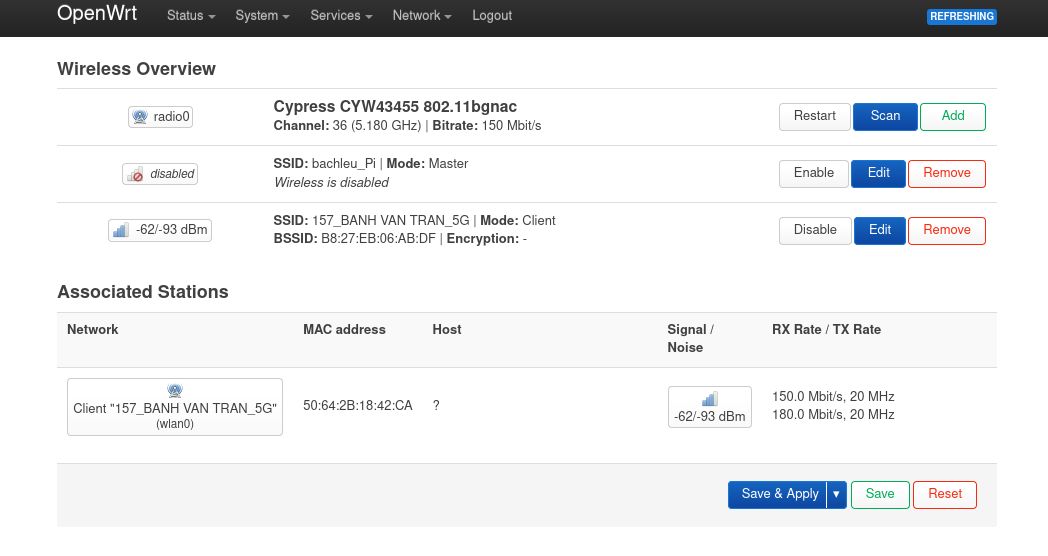
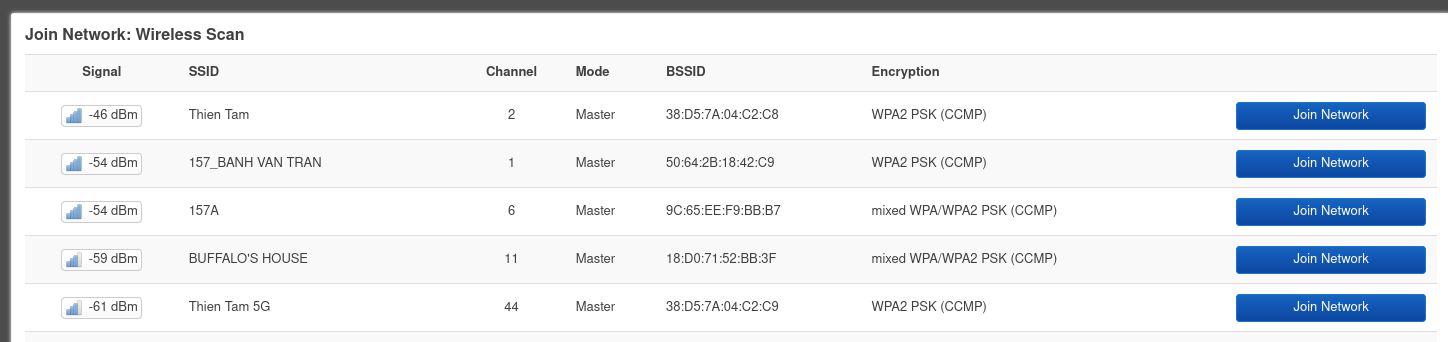
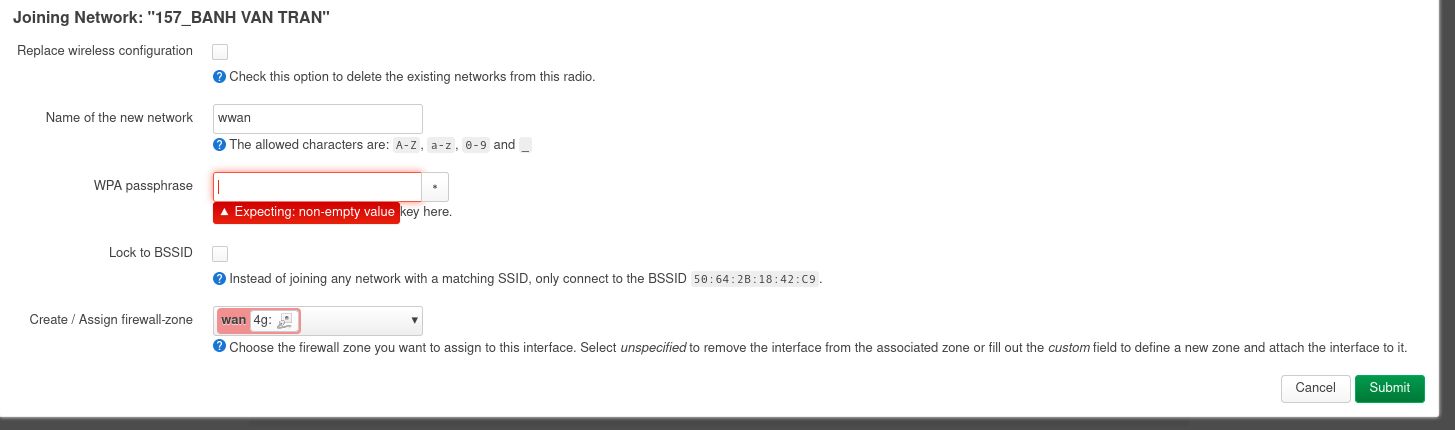
Type in password of that Wifi AP and submit. On the next page, you can just press Save, as that page only matters when you create an AP from this board. Press Save & Apply. Now go to Network -> Interfaces. You should see another interface added in.
Now go to System -> Software and update lists. You have to do this at every restart when you want to install new packages.
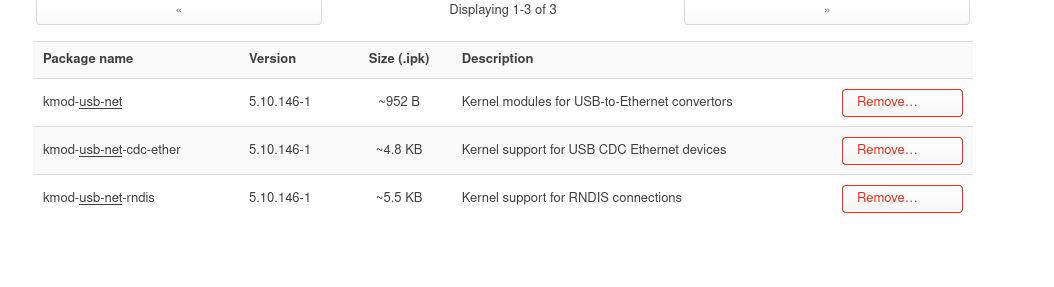
You need to install these packages to use the 4G USB Modem, in this case an Android phone.
Preparing the access point
There are 2 ways around this. Either set this router into Access Point mode, or you can turn off DHCP Server, which is a function that hands out IP address to devices connecting to it. I chose the latter, because I never had much luck with the former. Every time I try putting a router into AP mode, I end up resetting it at the end due to not being able to access its configuration page. But you do you.
After that, use an Ethernet cable, connect Raspberry Pi to any LAN port on the TP-Link router, or either LAN / WAN if you choose AP mode.
Finding place to put the "combo" device
As I previously mentioned, location is important when it comes to 4G connection. In my case, the house is situated near a cell tower, right outside the kitchen's window.
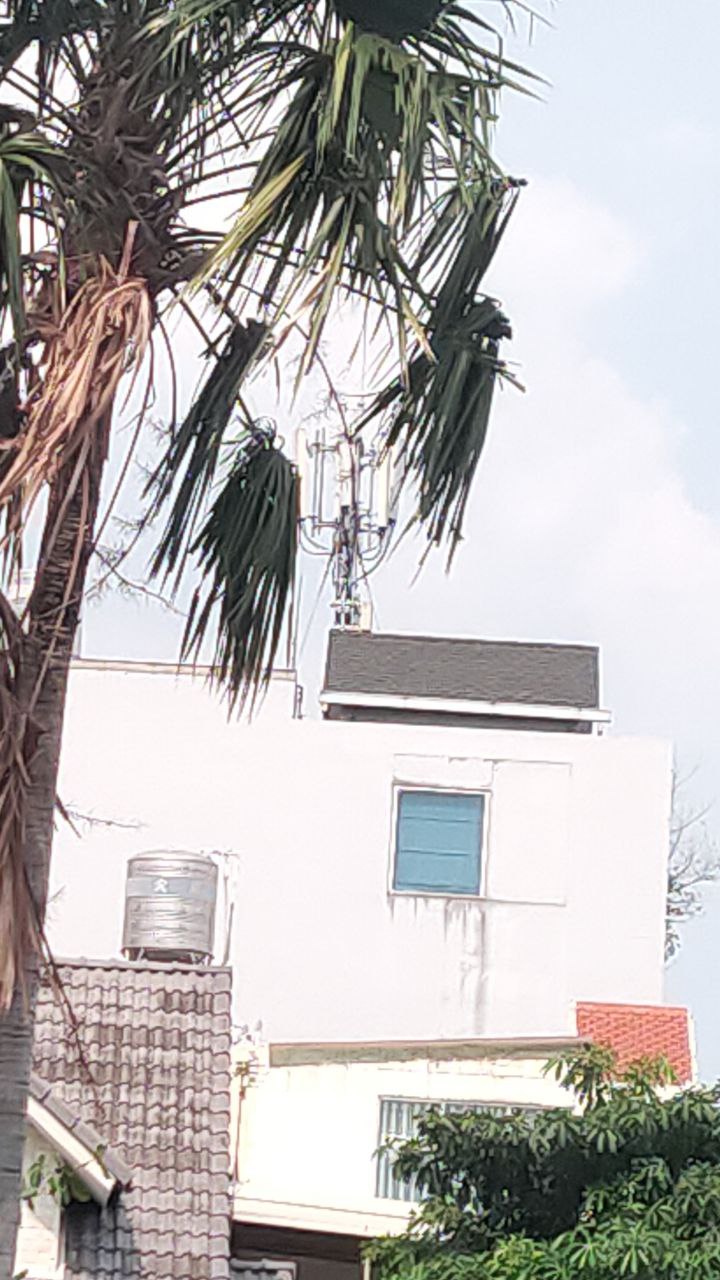
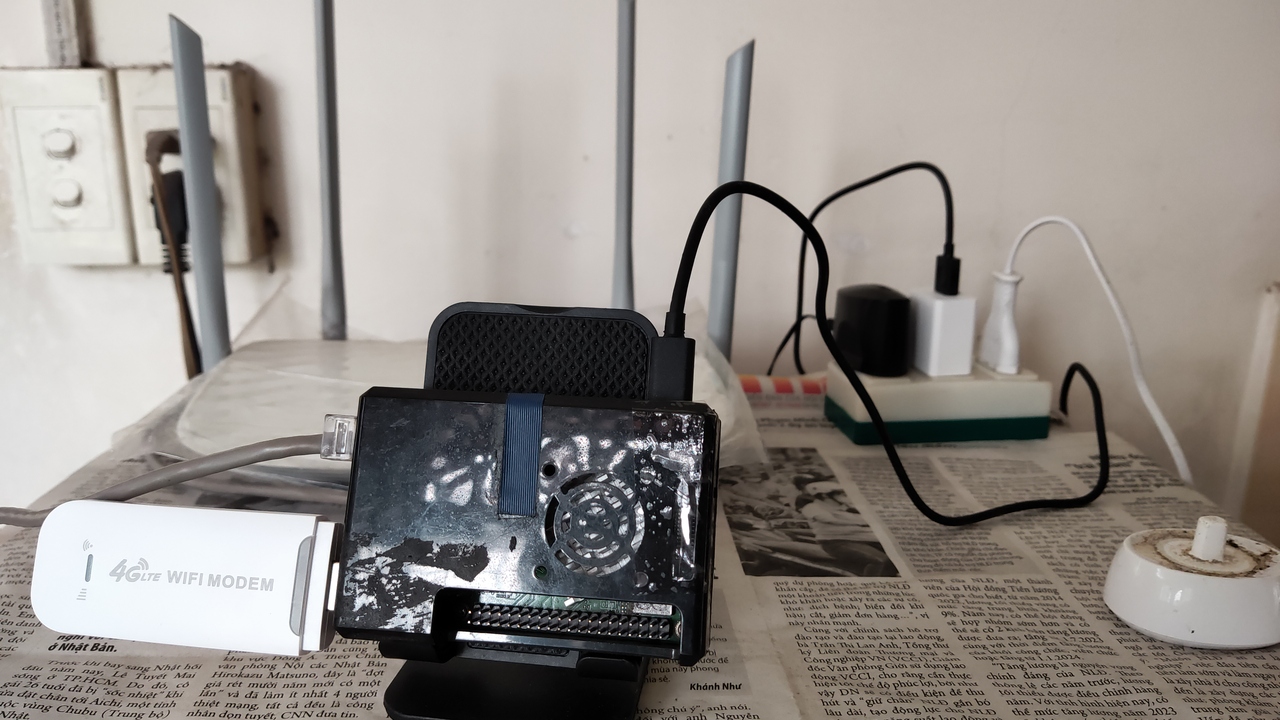
So the obvious answer is to place the router, the access point, the modem in the kitchen, right? Well, yeah. I put the combo in a chair at first, and also tried to elevate the phone using the Pi as leverage. That way the phone could get the best signal. It was a sight to behold.
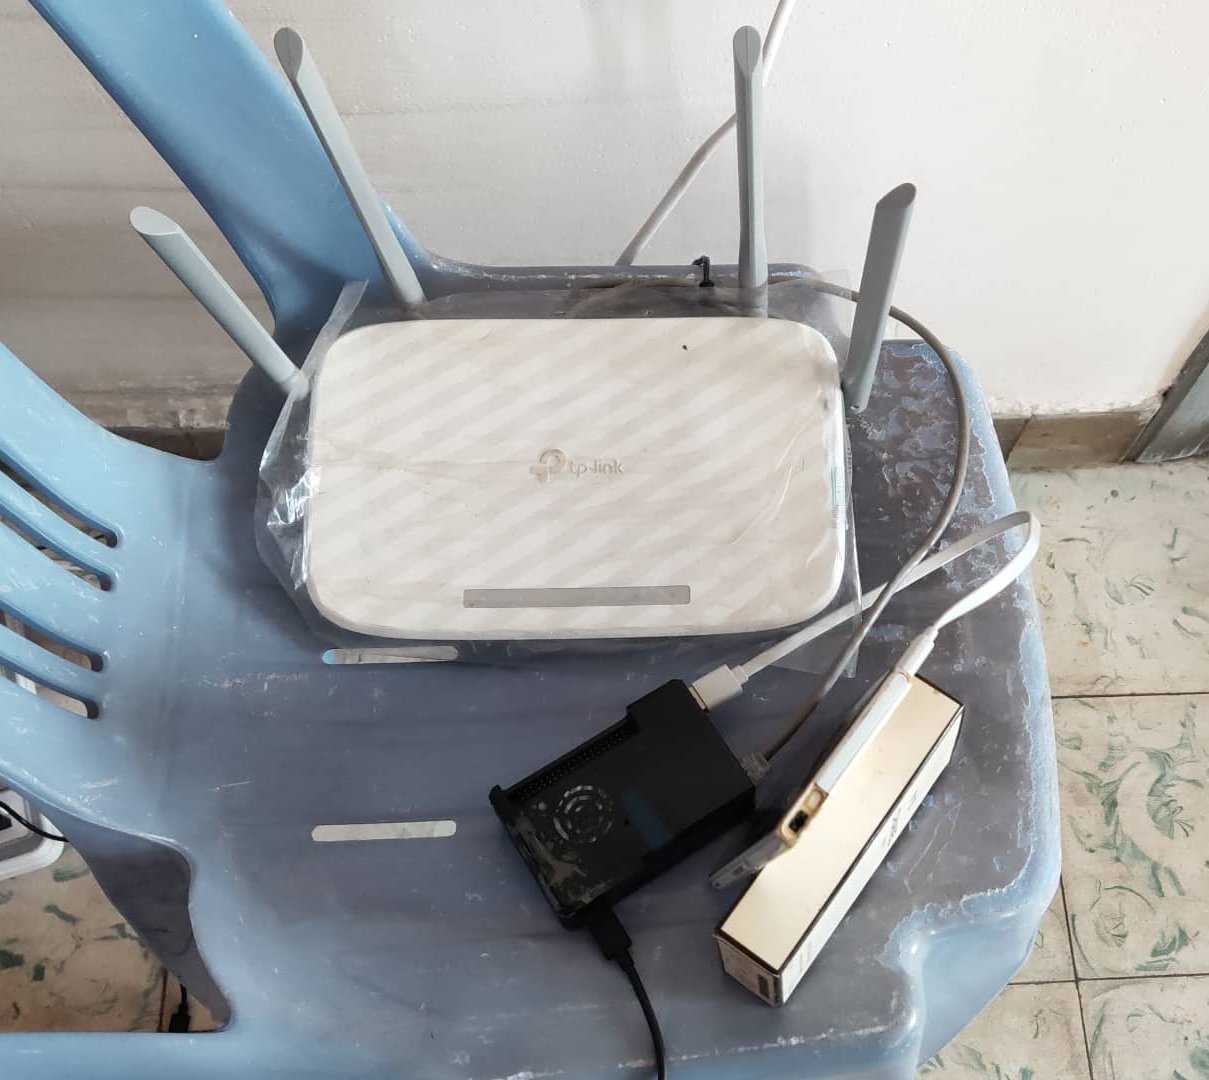
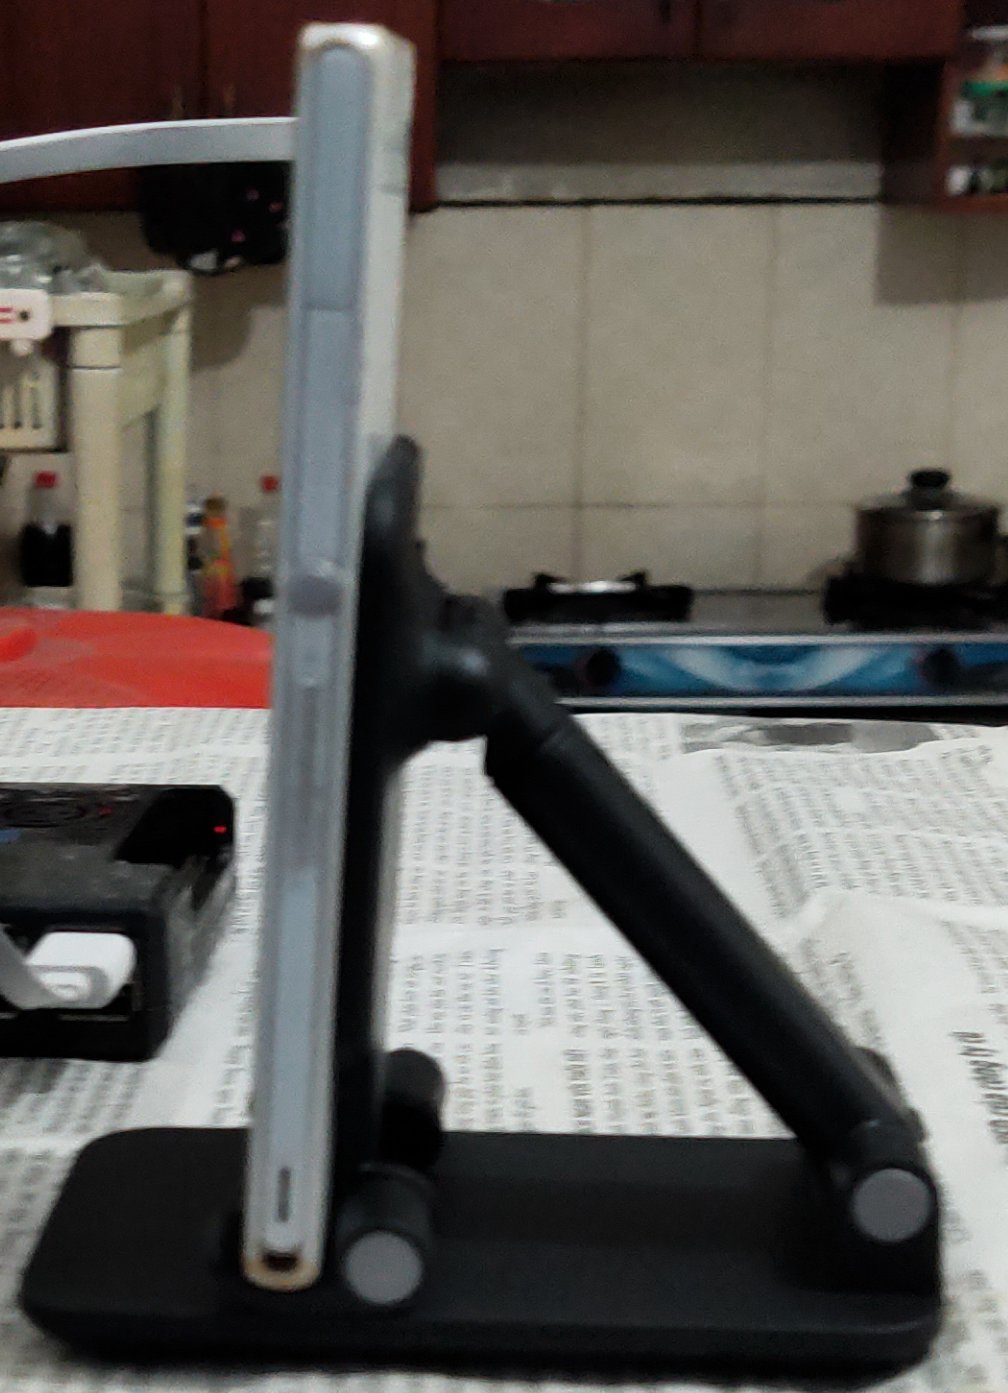
2 weeks after that, I got a dock to prop the phone up properly so it looked more professional and moved the combo to the top of the fridge, closer to the cell tower. By placing it there, I got -89 dBm, as opposed to -95 dBm on the chair. It was not much, because this was an old phone, but good enough to work.
Getting the router to connect to the Internet
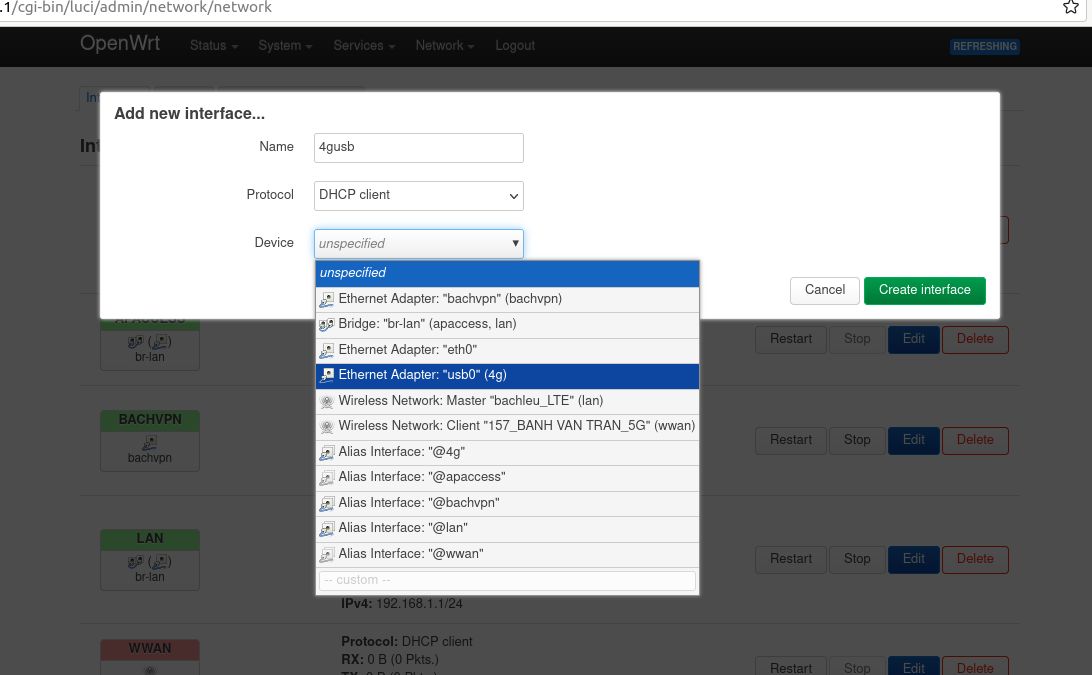
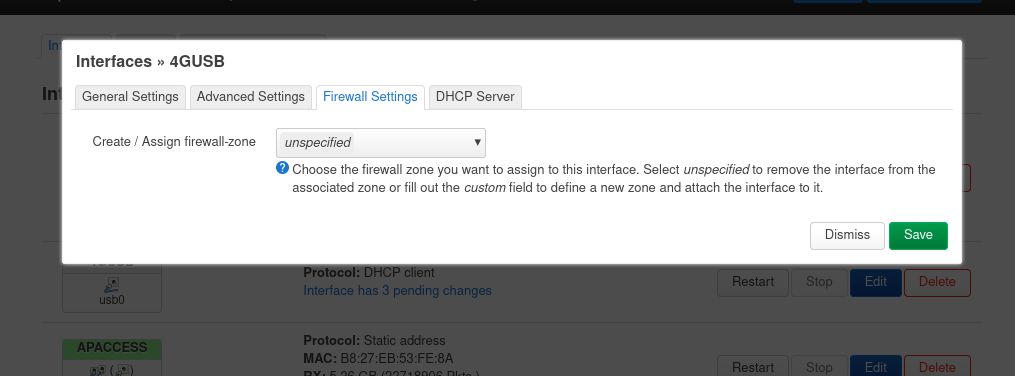
Plugging the phone to the Raspberry Pi, I had to register the phone as a network interface on OpenWrt. Go to Network -> Interfaces. Click Add New Interface. Name the interface. Choose DHCP client as protocol, because you will get IP address from the USB-tethered phone. In device, choose usb0 and click Create Interface. On the next screen, pick Firewall Settings, assign the interface to wan zone then Save. After that, click Save & Apply. So instead of cable Internet, I connected to the Internet via 4G network.
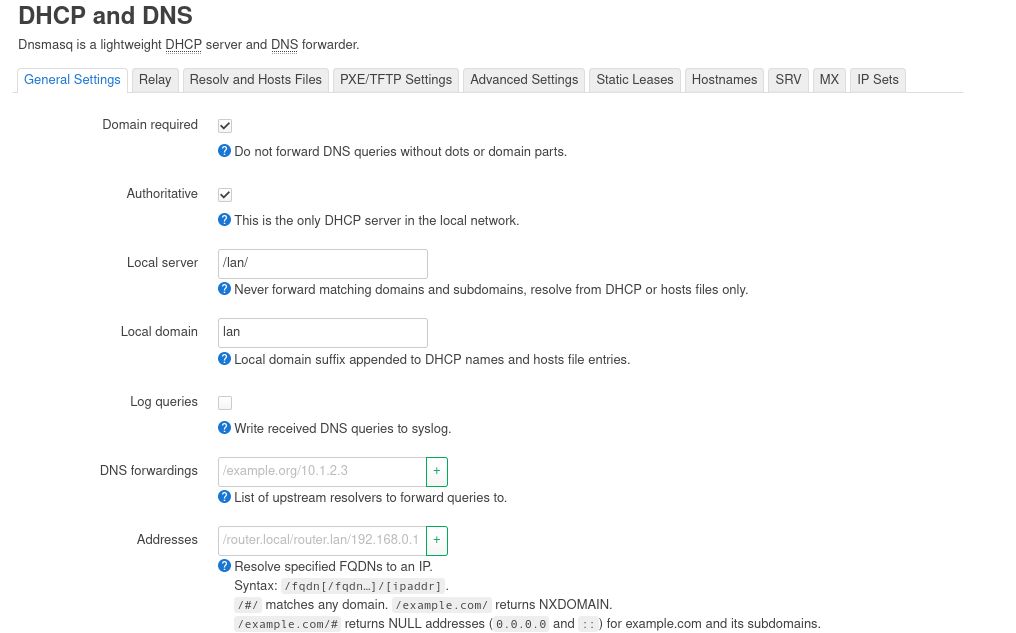
If you prefer to use your custom DNS, go to 4G interface, Advanced Settings, uncheck Use DNS servers advertised by peer. Then go to Network -> DHCP and DNS. Fill in your desired DNS in DNS forwardings (remember to press plus) then Save & Apply.
Result
So far so good. It worked like a dream. The Internet was a lot better. And thanks to the Raspberry Pi having a better CPU than most routers, it could withstand more clients connecting to the network and route better. On early morning or late night, I could get up to 80 Mbps download. Speed is inconsistent throughout the day, ranging from 15 to 50 Mbps. But overall, it's more stable than the cable Internet.
Improvements
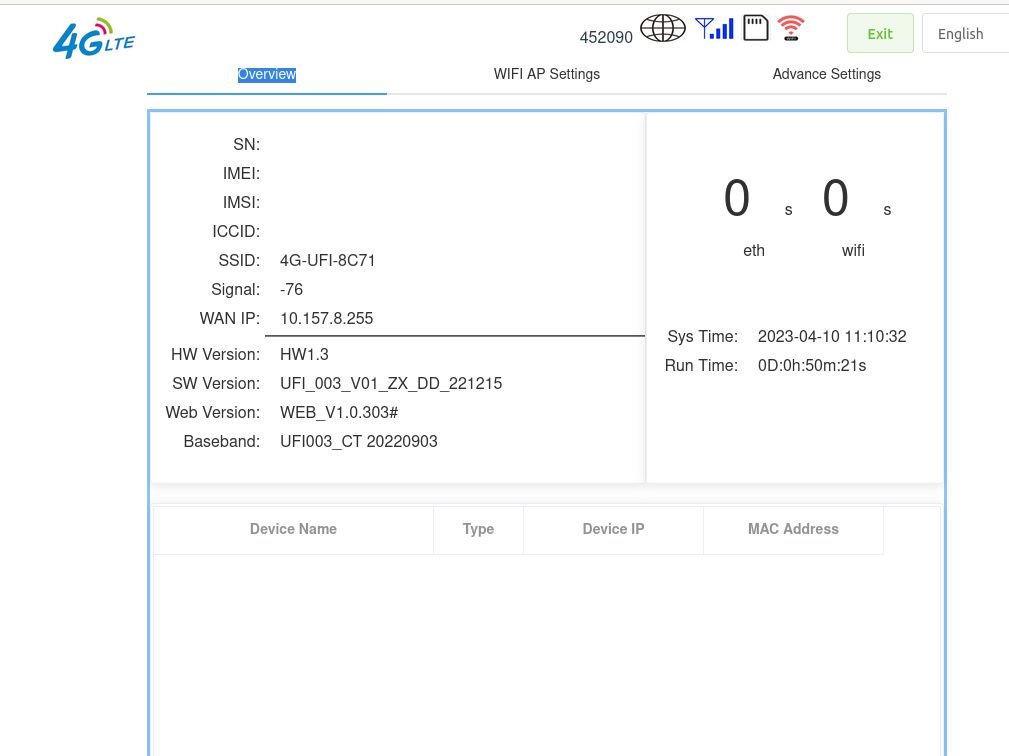
About 3 weeks into the project, I swapped the phone for a 4G USB Modem, because doing this heated up the phone considerably and had a negative impact to its battery. It's a cheap no-name one because I wasn't gonna fully commit to this project. It also improved signal strength, getting it up to -76 dBm.
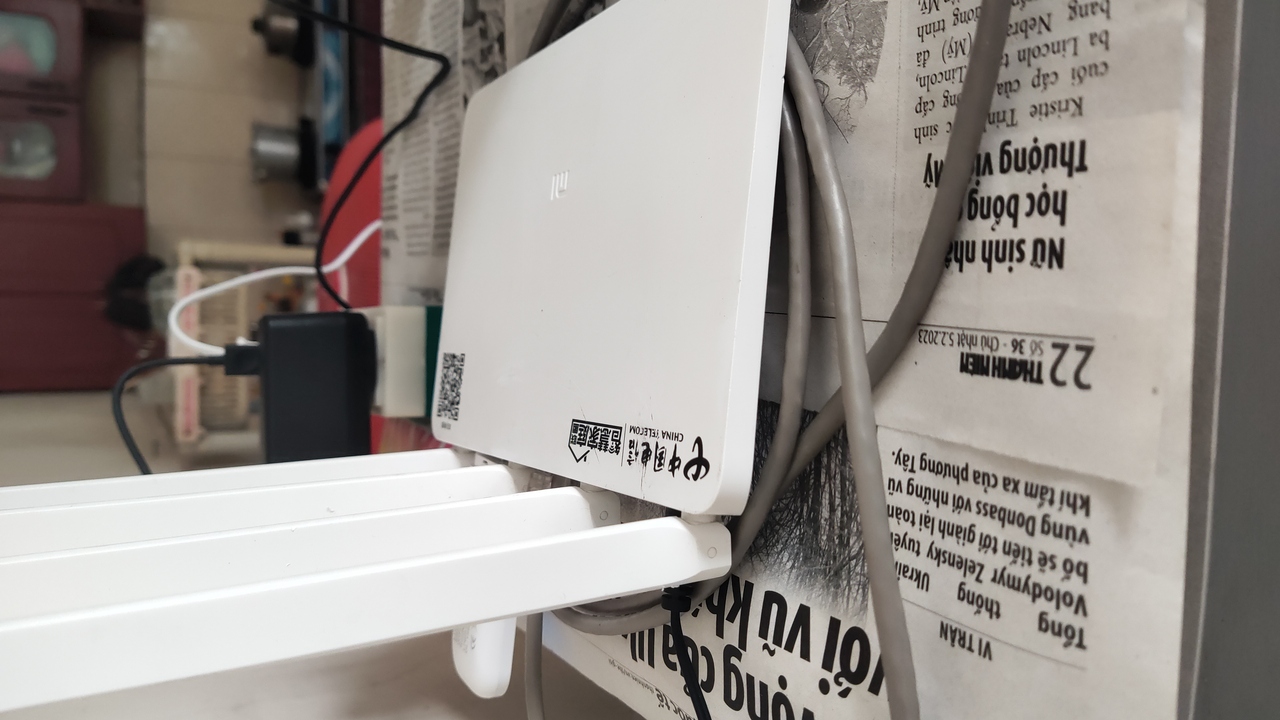
I also slowly phased out the TP-Link + Pi combo in favor of a Xiaomi Mi WiFi R3G v1. It's a router with MT7621 SoC with dual-core 880 MHz MIPS processor, 256 MB RAM, 128MB ROM. Compared to Raspberry Pi, it's like David vs Goliath. But it does feature hardware routing capability, so that's neat. It runs OpenWrt with 4G USB Modem support, so I could plug the USB Modem in and be done with it. Same performance with 1 less device to worry about.
References: